Four Seasons: My Japanese Embroidery Phase IV posted on June 30 2015 in embroidery, Japanese Embroidery 11 Comments
Here are some pictures of my Japanese Embroidery Phase IV. The piece, a Japanese Embroidery Center design, is called Four Seasons and focuses on couching and padding techniques. The four leaves are supposed to symbolize the four seasons transitioning into each other. Hope you like the photos!
Summer
Fall
Winter
Spring
My Phase IV next to My Phase VII ( :) )
食養山房 (A Cool Restaurant in Taipei and a Fine Place to Do Embroidery) posted on April 07 2015 in Dining, Japanese Embroidery, Taipei 5 Comments
When I was visiting Taipei a few month ago, my mom took me and two guests from the embroidery city of Suzhou to a restaurant tucked in a mountainous part of the Taipei suburb (http://www.shi-yang.com/), and then a tea room associated with the restaurant located a stone's throw away. I thought the food was gorgeous (and pretty delicious) and, what's more, I felt that both location would make an ideal location for Japanese Embroidery!
As you will see below, I took a ton of photos but due to my faulty memory some of the description of the food might not be entirely accurate.
One of the first rooms upon entering the restaurant
A flower arrangement
A view of the Second story
Our Table Upon Our Arrival
A starter course of passion fruit vinegar garnished with a daisy
Peanut (?) tofu and chilled corn soup (?)
Plate of Sushi and Sashimi
Red Berries Decoration
Rice Balls with bamboo shoots or mushrooms (?)
The piece de resistance of the meal, a chicken soup that "opens up" a closed lotus flower that the server floats on the soup
The lotus "opens"
Dessert was a taro custardy thing garnished with a stem of little pumpkins
My mom and our two guests (right is my Chinese embroidery teacher Pearl)
Another shot of mommy!
Yet Another Shot!
The little red lanterns in the garden as we exit
Shi-Yang Tea Room
Shi-Yang tea room (I thought this would be a fabulous place to do Japanese embroidery)
Not sure if it's just me, but this looks like it could be a real life model for a Japanese Embroidery design
Queen of the Flowers-My Japanese Embroidery Phase VIII posted on March 31 2015 in Japanese Embroidery
This week I wanted to share with you photos of my new Japanese Embroidery piece. It's a Japanese Embroidery Center Phase VIII piece called Queen of the Flowers, and depicts a branch with three peonies in various stages of bloom by the techniques of fuzzy effect, which technique, according to my Japanese Embroidery textbook, is considered "the most dignified" of all Japanese Embroidery techniques.
My other Japanese Embroidery text book indicates that the technique of fuzzy effect was selected because it best conveys the stateliness and refinement of peonies, long considered the Queen of Flowers.
Here's the piece in its entirety. Prior to stitching this piece, it was recommended that I decide where the source of light is coming from, and this decision would impact the colors and shading of the motifs. I decided the top right corner. To highlight this, I photographed this in the evening with a lamp shining from the top right corner as well.
Peony #1 in Full Bloom
Peony #2 (slightly more faded) in full bloom
Peony #3 in half bloom. Re-did this peony in its entirety twice and various parts of it multiple times ;_;
A multitude of leaves, one fading after the other
The Peony branch in daylight
An Exquisite 19th Century Embroidered Kimono posted on January 20 2015 in Japanese Embroidery
I'm glad I caught one of the last few days of the Met's exhibition on the history of kimonos, which concluded this past Sunday. Looking through the exhibition, I was greeted by this gorgeous blue satin wedding uchikake magnificently embroidered in a shell-matching game box design.
The Met description noted that this light blue uchikake, dating to either the Edo (1615-1868) or Meiji period (1868-1912), was likely worn by a young woman of the wealthy merchant class. The theme of shell-matching game boxes led the curator to believe that the kimono was created originally for a wedding, since only two properly matching halves of a shell can be paired in a traditional game of matching shells and thus symbolized a married couple.
Hope you enjoy the pictures. I took photos of a couple other exhibited kimonos, and I will post them in due course.
A detail of one of the matching shell game boxes. The description noted that the design of the boxes originated from scenes from the Tale of Genji. Unfortunately, I am not able to identify which scene :)
Full View of the Luxurious Kimono. The blue appears darker than it actually is in this photo.
Another Game Box.
A pair of Shells.
Game Box
I thought the way this metal ring was done was so charming
The curator noted that the outstanding nature of this uchikake was highlighted by the fact that even the hem was lavishly embroidered. The hem was rarely decorated, as it is the most vulnerable part of the garment.
My Japanese Embroidery Phase VII- Camellias posted on January 13 2015 in Japanese Embroidery 173 Comments
I am really excited to share with you today pictures of my new Japanese Embroidery project, Camellias, a phase VII piece from the Japanese Embroidery Center. To risk sounding sentimental, Camellias was my first aspirational Japanese Embroidery piece.
Put in other words, when I saw this piece on the JEC website in high school, I decided that I wanted to study Japanese Embroidery. For this reason, it means a lot to me that I finally got to this place in my study of Japanese Embroidery, and along the way I've picked up a few other aspirational pieces :)
Without further ado, here are the pictures of my Camellias!
Title: Camellias
Design: Japanese Embroidery Center
Instructor: Deborah Bowers
Stitcher: Yours Truly
Camellia #1. I was quite happy with the final coloring of this Camellia.
Camellia #1 Detail.
Camellia #3. A white camellia with persimmon red streaks.
Although the flowers are the focal point of the piece, I found that the most challenging part of this piece is the fifteen or so leaves in flat silk foundation. It required a deep concentration to lay down the flat silk in an orderly manner and then holding down the flat silk with an even short stitch holding (to avoid fraying and stabilize the flat silk when stitched in long stitches). Really not the sort of thing that you can do while playing something in the background (at least for me).
Camellia #3 Detail.
Camellia #2.
A Bud.
Another notable part of the piece is the negative space at times required on the flower petals. I think it was easier to stitch out a camellia fully than to decide which negative space to leave out, for example, on this half open white camellia towards the heart of the flower.
As framed in my apartment:
Summing up 2014 posted on December 30 2014 in Chinese embroidery, french embroidery, haute couture embroidery, Japanese Embroidery 2 Comments
For the last post of 2014, I thought I would share with you images of the projects I completed in the last year.
Hope you like the photos! I have some cool projects planned for next year, so hopefully I will be able to get them done as well.
Eternal Grace (Phase VI Design from the Japanese Embroidery Center)
Eternal Grace (Full View)
Reproduction of 18th Century Pattern
A Paradise Catcher
Detail
Reproduction of 18th Century Pattern
Detail of Cuff
Cymbidium
Detail
A Wheel Motif
Giverny Top and Red Organza Skirt
Flower Bouquet (Phase I Design from the Japanese Embroidery Center)
Interior Shot
Last Project of the year. Phase VII design from the Japanese Embroidery Center. I will post about this in the New Year once it comes back from the framer!
My Japanese Embroidery Phase I: Flower Bouquet posted on November 19 2014 in Japanese Embroidery 5 Comments
As some of you know, I've been studying Japanese Embroidery for several years. I recently finished this piece, and it just came back from the framer, so I thought I would share the images with you!
As you can see, the subject of the piece is a bouquet of flowers in a wrapper. This was stitched under the instruction of my Japanese Embroidery teacher, Deb Bowers of Hyde Park, New York. I've been studying with her for several years and her class is very informative and a lot of fun! The design is from the Japanese Embroidery Center from Atlanta. I kept everything the same except I switched out a few stronger colors for more muted versions.
Here's the embroidery when it was still on the frame.
And here is another shot of the piece in my dining room/library.
Detail of Iris
Detail of Pinks
Detail of Valerian
Detail of Chrysanthemums
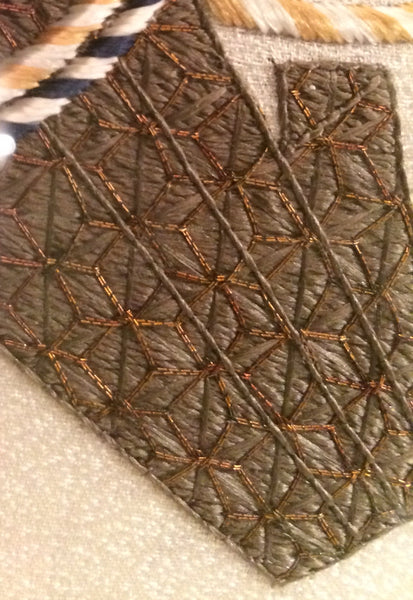
For the flax leaf metallic lattice on top of the silk foundation of the bouquet wrapper, I struggled a bit because my originally planned gold or silver didn't have the effect I was imagining. Luckily, I found this metal thread in Deb's collection and she graciously let me have some. I would describe it as a nutty gold color with some flecks of metallic dark brown.
A word about the frame. The framer suggested this red oak frame finished with silver mica powder paint. I think the medium tone of the finish works really well with the lavender of the iris and the medium toned greens used throughout the piece.
I love how the grain of the wood still shows on the frame and I think it kind of complements the nature theme in the embroidery.